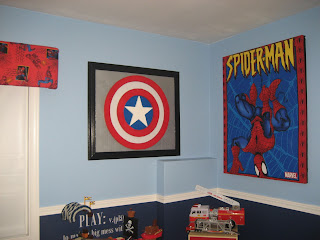
In a previous post I explained how to make a Batman sign out of stryofoam and then to frame it out of floor trim. This post is very similar but is for Captain America and Superman. And I also want to give credit to where I found this awesome idea from the blog, All Things Thrifty, specifically this post (for Captain America) and this post (for Superman).
Just like in the Batman sign, the biggest difference in my signs compared to the one on "All Things Thrifty" is that I'm using stryofoam and she uses mdf board. The mdf board would be far sturdier and easier to paint but with limited tools on hand, I chose to use stryofoam. The total costs of the projects between the two materials is probably pretty similar.
I am combining my Superman and Captain America signs into one blog as I realize I did not take many pictures of Captain America. To start, I cut out the Superman logo with my Cricut and pieced the vinyl sections together onto the stryofoam. I then cut out the black and red vinyl sections.
The next step was to paint a cherry red and many coats onto the stryofoam. The stryofoam takes many coats and you want it to dry completely between coats. Spray paint works much better but only a few colors are available in the type of spray paint that is safe to use on stryofoam.
The next step is to add bright yellow felt to the back of the Superman logo. I decided to cut it into sections to ensure a secure fit.
And here is the front of Superman after the felt is attached!
As I mentioned before, I failed to take many pictures of Captain America. However, now you can see what Captain America looks like after being cut, painted and having the blue felt attached.
I used blue felt and white felt for this sign. I did paint the star white and the rings a bright red. The blue felt is already attached and I'm just getting ready to attach the white felt. The next picture shows where I am at with all three signs. Things are starting to look pretty good!
And now we see all three signs with the back styrofoam piece attached.
For Captain America I chose a silver/gray color so that the white will stand out on the logo. If you have already seen my Batman post then you know we still have one more step to do. The picture below shows what my awesome husband did to really make the signs stand out in my son's room.
My husband took extra floor trim that we had, cut all of the pieces and painted them a semi-gloss black. Then he attaches the Superhero signs on the wall and with a staple gun, he frames the signs to the wall. The finished signs are below!
The room is starting to look pretty sharp and my son is so excited to see all of the Superhero stuff in his room! There are more Superhero stuff in the room that you can see my checking out my other posts and there is more still to come! When everything is all complete I will make sure and post all angles of the room until then I hope you like what you see!
Welcome to my Website! In addition to creating and selling my products, I love to try new ideas, many of which will be showcased in my blog found on the Home page! Check back often for new blogs and new items I will have for sale! Need something designed but do not see it in my catalog listed under the Vinyl Templates tab? I can custom design nearly anything, please contact me and we may be able to create a wonderful product based on your ideas! -- Cindy


These superhero signs you made are amazing...Great job and Great imagination. Thanks for sharing!
ReplyDelete