Finally, after many posts on my son's Superhero room - it is finally finished! I am sure....that I will find more "little" things to add, but for now it is done. I love the fact that nearly the entire room is made by "me"! The only things that I could not make was the bedding, new trash can (aka laundry basket), and the Superhero wall stickers.
I will forewarn you that this post will have many pictures but short of taking a video, this is the best that I can do. I will try and explain things the best that I can while showing the pictures.
As you open the door, this is the first thing that you will see.
The sign is a picture of Batman and Robin that I made in vinyl. To finish the picture I added the words "Welcome All SuperHeros" in dark blue vinyl.
To the very right of this wall, we took the Batman logo we had made for a different project and oversprayed it with black spray paint. Then I took bright yellow vinyl and added "Batman" inside the logo to achieve the following effect.
To the left of the "Welcome All SuperHeros" sign, is the main part of the bedroom. Following around the wall is the closet. I moved my son's letters that was on a different wall and placed them to the right of the closet. And then added just a few small Superhero stickers on the closet doors and above the closet.
The next picture shows part of the closet and then the next, main wall of the room. This is really the first wall you see once you walk past the door and this is where my son's name was previously placed. The picture below shows the new Batman sign we made, which is just fabric wrapped around a wooden frame my husband built. And you will see a few Superhero stickers on the small "dresser" that is below the Batman canvas.
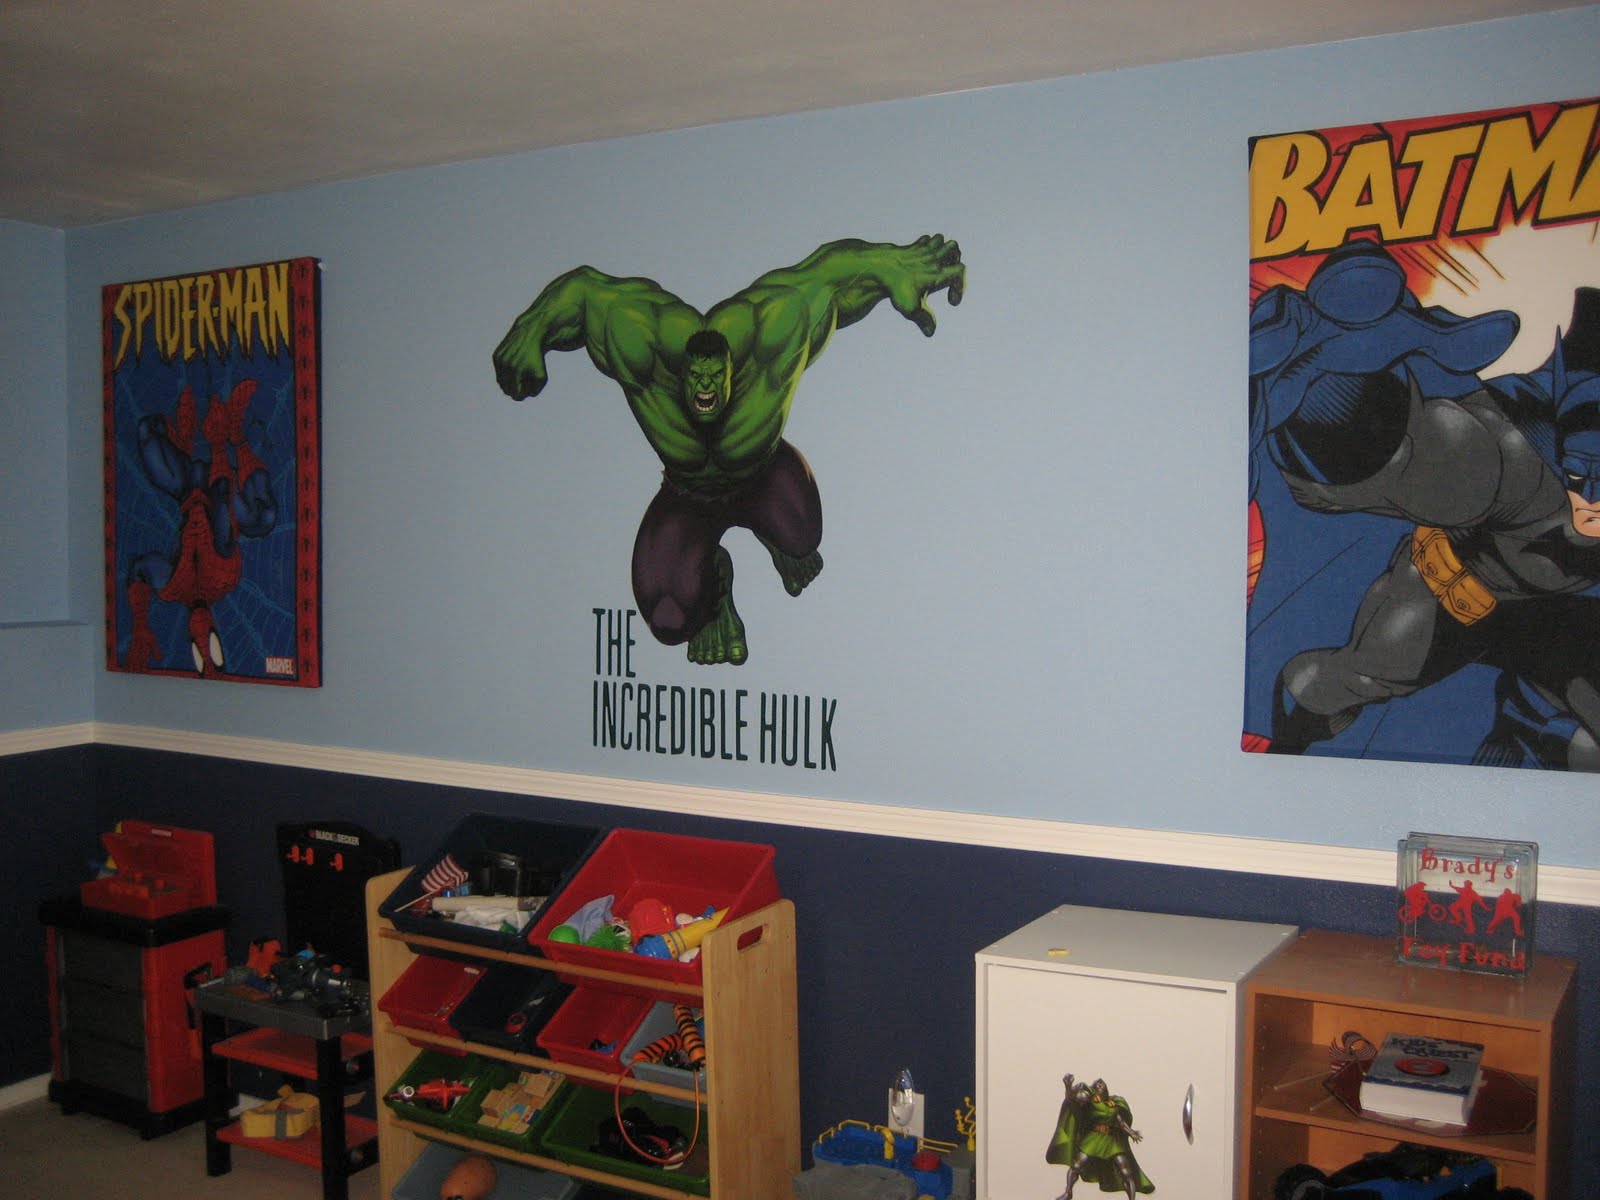
This next picture shows the entire wall. The Spiderman canvas is another piece of fabric, but this time we wrapped it out of 1 1/2 inch stryofoam that we had Lowes cut for us. And the Incredible Hulk sticker I bought online. I made "The Incredible Hulk" in dark green vinyl.
To the left of this wall, is the Captain America sign that I made out of stryofoam. I have never worked with stryofoam before and was amazed by what can be created with this and how inexpensive the product is. I have several posts about the stryofoam signs I made so I won't go in detail here. But this is the Captain America sign I made and then I added a small Captain America wall sicker next to it.
The next picture shows the entire wall. The Spiderman window valance, I made out of stryofoam. Super easy and super cheap! Again, I have another post on that (I think...if I don't, I will make one soon) and then the "Super Hero in Training" canvas to the left of the window, I also made. That I used vinyl and a basic 16 x 20 canvas. The rest of the wall has small Superhero wall stickers.
Here is a close up of the canvas I made!
The next picture shows the bed which has new Superhero bedding and the Batman sign above the bed. The sign is made out of stryofoam and looks so nice in person! Around the sign is more, small Superhero wall stickers. To the left of it is a preview of the custom made photo canvases!
The next picture shows a lot of stuff! The trash can is the laundry basket and the lid (aka shield) is one of my son's favorite part of the room! To the right of that is the dark blue cubbies. I have baskets sitting on the top which holds all of the kids' Superhero masks in the green basket and the costumes in the blue basket. On the wall above the cubbies, is the NYC skyline with Spiderman flying down from the canvases. The photo canvases I made with styrofoam, black fabric and black & white pictures (more info on an older post). Then above the photo canvases, I have in dark blue and red vinyl, "Sometimes Friends (and my Brother) are Better than Superheroes". To the short wall on the left, I made out of stryofoam the Superman's logo. Below that I made the "Bang" sign out of white vinyl.
Finally, as you walk out the door, I have one small Superhero sticker and a small vinyl sign that says "POW".
So, that's it! This project took a long time to do, but it was definitely worth it! My son may not appreciate that nearly everything is home made but I love the fact that it is and my son is very happy with the end result!
Welcome to my Website! In addition to creating and selling my products, I love to try new ideas, many of which will be showcased in my blog found on the Home page! Check back often for new blogs and new items I will have for sale! Need something designed but do not see it in my catalog listed under the Vinyl Templates tab? I can custom design nearly anything, please contact me and we may be able to create a wonderful product based on your ideas! -- Cindy
Showing posts with label Super Heros. Show all posts
Welcome All Superheroes - Vinyl
It's been a few weeks since I have written any updates on my son's Superhero room. Needless to say, I am very, very close to finishing and am hoping by tomorrow night the room will finally be complete. I have been struggling on how to completely, complete the room. I had many "ok" ideas but nothing that just felt right.
I finally came up with a sign for the very short wall that everyone sees as soon as they walk into the room. I found the image online and was able to cut it with my Cricut. This is my first attempt at triple layering an image. Here are a few pictures of how I had to cut each color and then layer them one by one so that all three layers are together prior to putting it on the wall.
And then I needed a "welcome" message for my son's room that went along with the Superhero sign. For those that do not know (I was one of them), the sign is a picture of Robin and Batman, I thought it was just generic superheroes but my 5 year old instantly corrected me on my mistake. Below is the finished product!
Hopefully, tomorrow night I will have an updated blog showing off the finished room with tons of pictures!
I finally came up with a sign for the very short wall that everyone sees as soon as they walk into the room. I found the image online and was able to cut it with my Cricut. This is my first attempt at triple layering an image. Here are a few pictures of how I had to cut each color and then layer them one by one so that all three layers are together prior to putting it on the wall.
And then I needed a "welcome" message for my son's room that went along with the Superhero sign. For those that do not know (I was one of them), the sign is a picture of Robin and Batman, I thought it was just generic superheroes but my 5 year old instantly corrected me on my mistake. Below is the finished product!
Hopefully, tomorrow night I will have an updated blog showing off the finished room with tons of pictures!
Super Hero in Training - Custom Canvas
I am STILL working on my son's Super Hero room and came across a perfect idea that would fit right next to my son's bed. The idea was great, the cost was way too expensive so I made my own!
From Red Envelope I ran across this canvas which starts at $79. I decided to take one of my 16 x 20 inch canvases (bigger then the $79 finished product) that I purchased for under $5 at Michaels and started from there. Even though the canvas is already white, I decided to add several coats of white paint on it. The paint adds extra texture and I wanted the canvas to have a brush stroke effect where you could see brush strokes when looking at it from different angles. I then added one coat of Modge Podge to give a glossy finish AND to add more texture. This will make it easier to attach the vinyl onto the canvas. I do have a little secret up my sleeve which is the best idea my husband has ever had! It is this!
I know it doesn't look like much, but this is a piece of drywall that my husband cut to fit perfectly inside the back of the canvas. You could use any type of wood or board, we just have tons of extra drywall in our garage so my husband used that. By having this inside the back of the canvas you do not have any sag when applying the vinyl to the front of the canvas. It's now as solid as a hard cover book or a table.
Now that my canvas is painted and prepped to add vinyl, I needed a special logo. I could use Captain America's logo which is what is shown on the Red Envelope site, but I have that sign further down the wall where I want to put this canvas on. I searched the Internet for ideas and found the perfect solution! From The Lady Wolf's blog I found this set of files that had the perfect Super Hero logo for my son! This is the Superman's logo but instead of "S" for Superman, I can replace it with "B" for my son's name. My canvas now looks like this!
The 2 red lines are just markers as I layered my image prior to putting it on the canvas. I also need the markers to line up the text on the bottom half of the canvas. I now followed the same theme as Red Envelope for the bottom half of the canvas. I used red and blue for the bottom half as that is also the same colors for Superman.
The picture above shows the bottom half lined up by using the markers and taped on. After taking the transfer tape off and removing the temporary markers, we have the finished product.
At this point, all I did was add one more layer of Modge Podge to secure the vinyl on the canvas. I also did this because I used glossy vinyl for the red but the blue and the yellow had a matte finish. After using Modge Podge, the entire canvas now has a glossy finish. Here is the canvas in my son's Super Hero room!
Excuse the top of my son's head in the picture, I was tucking him in for bed and didn't see he made it in the shot! But...for literally pennies on the dollar I love how my son's new canvas turned out! And if you like Super Heroes then please check out the rest of the blogs in October as nearly all of them are about Super Heroes!
From Red Envelope I ran across this canvas which starts at $79. I decided to take one of my 16 x 20 inch canvases (bigger then the $79 finished product) that I purchased for under $5 at Michaels and started from there. Even though the canvas is already white, I decided to add several coats of white paint on it. The paint adds extra texture and I wanted the canvas to have a brush stroke effect where you could see brush strokes when looking at it from different angles. I then added one coat of Modge Podge to give a glossy finish AND to add more texture. This will make it easier to attach the vinyl onto the canvas. I do have a little secret up my sleeve which is the best idea my husband has ever had! It is this!
I know it doesn't look like much, but this is a piece of drywall that my husband cut to fit perfectly inside the back of the canvas. You could use any type of wood or board, we just have tons of extra drywall in our garage so my husband used that. By having this inside the back of the canvas you do not have any sag when applying the vinyl to the front of the canvas. It's now as solid as a hard cover book or a table.
Now that my canvas is painted and prepped to add vinyl, I needed a special logo. I could use Captain America's logo which is what is shown on the Red Envelope site, but I have that sign further down the wall where I want to put this canvas on. I searched the Internet for ideas and found the perfect solution! From The Lady Wolf's blog I found this set of files that had the perfect Super Hero logo for my son! This is the Superman's logo but instead of "S" for Superman, I can replace it with "B" for my son's name. My canvas now looks like this!
The 2 red lines are just markers as I layered my image prior to putting it on the canvas. I also need the markers to line up the text on the bottom half of the canvas. I now followed the same theme as Red Envelope for the bottom half of the canvas. I used red and blue for the bottom half as that is also the same colors for Superman.
The picture above shows the bottom half lined up by using the markers and taped on. After taking the transfer tape off and removing the temporary markers, we have the finished product.
At this point, all I did was add one more layer of Modge Podge to secure the vinyl on the canvas. I also did this because I used glossy vinyl for the red but the blue and the yellow had a matte finish. After using Modge Podge, the entire canvas now has a glossy finish. Here is the canvas in my son's Super Hero room!
Excuse the top of my son's head in the picture, I was tucking him in for bed and didn't see he made it in the shot! But...for literally pennies on the dollar I love how my son's new canvas turned out! And if you like Super Heroes then please check out the rest of the blogs in October as nearly all of them are about Super Heroes!
Graffiti or Custom Art???
I typically do not blog only on my son's room but that has been my main focus this last month! I know this will be my only chance for the next few years as it's only once that your boy outgrows a twin size bed and moves up into a full size bed. It would have been so much easier to just purchase full size Disney Cars bedding to match his room decor but instead we have completely taken out everything associated with cars and switched over to Superheros.
Nearly every blog this month has been on Superheros so what is one more??? Well, you will still get a few more but this is a nice, short and sweet blog on graffiti. In previous posts I cut out different Superhero logos out of styrofoam, painted them and then framed them onto the wall. While doing this one of my scrap stryofoam pieces was the Batman logo.
The piece wasn't perfect enough to just hang on the wall so I decided to temporary place it on the wall, just long enough for my husband to take a can of spray paint and over spray the Batman logo. We then removed the stryofoam piece from the wall and now have this!
I then went to my loyal Cricut and cut out a bright yellow vinyl sign that simply just said "Batman" to place in the middle of the graffiti. And now I'm hoping this "graffiti" can now be called "art"! :)
Oh...and I have to mention...when we showed my son the new "sign" the very thing he notices is the sign just to the right of the door of this!
I had also cut that out earlier in the day...so he doesn't notice a 2 foot wide spray painted sign of Batman but a 6 inch wide, little tiny sign of "POW"... Once my son did finally notice the Batman he did love it!
Nearly every blog this month has been on Superheros so what is one more??? Well, you will still get a few more but this is a nice, short and sweet blog on graffiti. In previous posts I cut out different Superhero logos out of styrofoam, painted them and then framed them onto the wall. While doing this one of my scrap stryofoam pieces was the Batman logo.
The piece wasn't perfect enough to just hang on the wall so I decided to temporary place it on the wall, just long enough for my husband to take a can of spray paint and over spray the Batman logo. We then removed the stryofoam piece from the wall and now have this!
I then went to my loyal Cricut and cut out a bright yellow vinyl sign that simply just said "Batman" to place in the middle of the graffiti. And now I'm hoping this "graffiti" can now be called "art"! :)
Oh...and I have to mention...when we showed my son the new "sign" the very thing he notices is the sign just to the right of the door of this!
I had also cut that out earlier in the day...so he doesn't notice a 2 foot wide spray painted sign of Batman but a 6 inch wide, little tiny sign of "POW"... Once my son did finally notice the Batman he did love it!
NY Cityscape Vinyled - Superhero Room cont.
My son's Superhero room is still a work in progress. The major stuff is done now it's time to add little things throughout the room. This blog is a simple project that made a big difference to one wall of my son's room.
I found online different cityscapes and decided on New York city since I know at least a few of the superheros protected that city in their prime. I wanted to make the cityscape as big as possible, which meant I had to piece the sign together. I have the height as 11.5 and then the width is 63 inches wide. I could have gone wider but then I would also need to piece together the vertical parts of the puzzle too since I'm past the height of my Cricut mat. With the current width of 63 inches I had two cuts in my one-piece city-scape that I had to line up on the wall just perfectly to make it appear seamless. Because I lined it up directly above the chair rail and having the vinyl all black, it was relatively easy to ensure everything lined up perfectly!
Here is a before picture of my son's room without the cityscape.
And now a couple pictures of the newly added cityscape!
You may notice that I have new blue cubbies underneath the cityscape. That came from my youngest son's room. And the garbage can is new! That is going to be my son's new laundry basket. I haven't decided if I want to paint it or not as I have seen some cool looking painted garbage cans converted into laundry baskets. And by the way...the lid is my son's favorite piece of the entire room as it's also a SHIELD! I also have new green and blue baskets. I purchased those from JoAnn's Fabrics a few months ago at 75% off, the total cost of 5 baskets was under $10! More pictures to follow on this room very soon!
I found online different cityscapes and decided on New York city since I know at least a few of the superheros protected that city in their prime. I wanted to make the cityscape as big as possible, which meant I had to piece the sign together. I have the height as 11.5 and then the width is 63 inches wide. I could have gone wider but then I would also need to piece together the vertical parts of the puzzle too since I'm past the height of my Cricut mat. With the current width of 63 inches I had two cuts in my one-piece city-scape that I had to line up on the wall just perfectly to make it appear seamless. Because I lined it up directly above the chair rail and having the vinyl all black, it was relatively easy to ensure everything lined up perfectly!
Here is a before picture of my son's room without the cityscape.
And now a couple pictures of the newly added cityscape!
You may notice that I have new blue cubbies underneath the cityscape. That came from my youngest son's room. And the garbage can is new! That is going to be my son's new laundry basket. I haven't decided if I want to paint it or not as I have seen some cool looking painted garbage cans converted into laundry baskets. And by the way...the lid is my son's favorite piece of the entire room as it's also a SHIELD! I also have new green and blue baskets. I purchased those from JoAnn's Fabrics a few months ago at 75% off, the total cost of 5 baskets was under $10! More pictures to follow on this room very soon!
Custom Captain America and Superman Custom Signs
In a previous post I explained how to make a Batman sign out of stryofoam and then to frame it out of floor trim. This post is very similar but is for Captain America and Superman. And I also want to give credit to where I found this awesome idea from the blog, All Things Thrifty, specifically this post (for Captain America) and this post (for Superman).
Just like in the Batman sign, the biggest difference in my signs compared to the one on "All Things Thrifty" is that I'm using stryofoam and she uses mdf board. The mdf board would be far sturdier and easier to paint but with limited tools on hand, I chose to use stryofoam. The total costs of the projects between the two materials is probably pretty similar.
I am combining my Superman and Captain America signs into one blog as I realize I did not take many pictures of Captain America. To start, I cut out the Superman logo with my Cricut and pieced the vinyl sections together onto the stryofoam. I then cut out the black and red vinyl sections.
The next step was to paint a cherry red and many coats onto the stryofoam. The stryofoam takes many coats and you want it to dry completely between coats. Spray paint works much better but only a few colors are available in the type of spray paint that is safe to use on stryofoam.
The next step is to add bright yellow felt to the back of the Superman logo. I decided to cut it into sections to ensure a secure fit.
And here is the front of Superman after the felt is attached!
As I mentioned before, I failed to take many pictures of Captain America. However, now you can see what Captain America looks like after being cut, painted and having the blue felt attached.
I used blue felt and white felt for this sign. I did paint the star white and the rings a bright red. The blue felt is already attached and I'm just getting ready to attach the white felt. The next picture shows where I am at with all three signs. Things are starting to look pretty good!
And now we see all three signs with the back styrofoam piece attached.
For Captain America I chose a silver/gray color so that the white will stand out on the logo. If you have already seen my Batman post then you know we still have one more step to do. The picture below shows what my awesome husband did to really make the signs stand out in my son's room.
My husband took extra floor trim that we had, cut all of the pieces and painted them a semi-gloss black. Then he attaches the Superhero signs on the wall and with a staple gun, he frames the signs to the wall. The finished signs are below!
The room is starting to look pretty sharp and my son is so excited to see all of the Superhero stuff in his room! There are more Superhero stuff in the room that you can see my checking out my other posts and there is more still to come! When everything is all complete I will make sure and post all angles of the room until then I hope you like what you see!
Just like in the Batman sign, the biggest difference in my signs compared to the one on "All Things Thrifty" is that I'm using stryofoam and she uses mdf board. The mdf board would be far sturdier and easier to paint but with limited tools on hand, I chose to use stryofoam. The total costs of the projects between the two materials is probably pretty similar.
I am combining my Superman and Captain America signs into one blog as I realize I did not take many pictures of Captain America. To start, I cut out the Superman logo with my Cricut and pieced the vinyl sections together onto the stryofoam. I then cut out the black and red vinyl sections.
The next step was to paint a cherry red and many coats onto the stryofoam. The stryofoam takes many coats and you want it to dry completely between coats. Spray paint works much better but only a few colors are available in the type of spray paint that is safe to use on stryofoam.
The next step is to add bright yellow felt to the back of the Superman logo. I decided to cut it into sections to ensure a secure fit.
And here is the front of Superman after the felt is attached!
As I mentioned before, I failed to take many pictures of Captain America. However, now you can see what Captain America looks like after being cut, painted and having the blue felt attached.
I used blue felt and white felt for this sign. I did paint the star white and the rings a bright red. The blue felt is already attached and I'm just getting ready to attach the white felt. The next picture shows where I am at with all three signs. Things are starting to look pretty good!
And now we see all three signs with the back styrofoam piece attached.
For Captain America I chose a silver/gray color so that the white will stand out on the logo. If you have already seen my Batman post then you know we still have one more step to do. The picture below shows what my awesome husband did to really make the signs stand out in my son's room.
My husband took extra floor trim that we had, cut all of the pieces and painted them a semi-gloss black. Then he attaches the Superhero signs on the wall and with a staple gun, he frames the signs to the wall. The finished signs are below!
The room is starting to look pretty sharp and my son is so excited to see all of the Superhero stuff in his room! There are more Superhero stuff in the room that you can see my checking out my other posts and there is more still to come! When everything is all complete I will make sure and post all angles of the room until then I hope you like what you see!
Custom Batman Sign
This project proved to be a little more time consuming then I expected but I love the end result! If you have read my previous posts this last month you can probably guess I'm still decorating my son's Superhero room. I found this idea to make Superhero logos from the blog, All Things Thrifty, specifically this post. I used the same 3 logos from the blog and the same dimensions. However, I did not have a scroll saw, projector and some of the other necessary tools to complete a project of this magnitude. That is, until I discovered the many uses of stryofoam! I think by the time I have finished my son's room he will have more stryofoam then anything else and no one will even know it!
Because I did not have a projector, I cut out the logos in vinyl with my cricut. This was also not as easy as it sounds because my cricut is limited to sizes of 12 x 24 inches but my logos were more like 24 x 28 inches in size. So I had to piece together the logos onto the stryofoam and then I used a specialized stryofoam knife to cut out the logo. The knife is plugged in and heated to a very high temperature and smells horribly when cutting; however, it cuts the stryofoam like butter! Super easy! Just have to take it slow and follow the lines!
The picture below shows the vinyl pieced together of the Batman logo that I want to cut. I want to keep the section in white and cut out the black.
And the picture below shows the stryrofoam cut out!
By following the post on "All Things Thrifty", I cut the piece a bright yellow! This is where my trouble starts. With stryofoam you need to have very specific paint or it will eat away the stryofoam. The same holds true for glue! Most craft or acrylic paint will work, it's best to brush it on and not use spray paint (which would have been much easier) but it's best to read the bottle to ensure the paint will work. Here is my new yellow Batman logo!
The next step was to pin and then glue black felt behind the yellow piece and then attach everything to a black painted board (in my case stryofoam). The next picture shows everything glued together!
And here is the sign above my son's bed!
Because, the sign is made out of stryofoam the edges are not as smooth and finished as I would like. I love the look but up close, it is rough looking. So I had my husband use extra floor trim that we had and frame the entire sign. Before he did that, my husband painted the trim a semi-gloss black. And this is the finished look!
I think the frame just makes the entire sign stand out! AND I have finished the Superman and Captain America signs as well! My husband framed and painted and put them all on my son's wall. Sometimes I am really happy to have a rained out weekend as my son's room went from nearly all bare walls to an almost finished Superhero room in less then 24 hours. I will post the other 2 signs and an updated picture of the entire room very soon!
Because I did not have a projector, I cut out the logos in vinyl with my cricut. This was also not as easy as it sounds because my cricut is limited to sizes of 12 x 24 inches but my logos were more like 24 x 28 inches in size. So I had to piece together the logos onto the stryofoam and then I used a specialized stryofoam knife to cut out the logo. The knife is plugged in and heated to a very high temperature and smells horribly when cutting; however, it cuts the stryofoam like butter! Super easy! Just have to take it slow and follow the lines!
The picture below shows the vinyl pieced together of the Batman logo that I want to cut. I want to keep the section in white and cut out the black.
And the picture below shows the stryrofoam cut out!
By following the post on "All Things Thrifty", I cut the piece a bright yellow! This is where my trouble starts. With stryofoam you need to have very specific paint or it will eat away the stryofoam. The same holds true for glue! Most craft or acrylic paint will work, it's best to brush it on and not use spray paint (which would have been much easier) but it's best to read the bottle to ensure the paint will work. Here is my new yellow Batman logo!
The next step was to pin and then glue black felt behind the yellow piece and then attach everything to a black painted board (in my case stryofoam). The next picture shows everything glued together!
And here is the sign above my son's bed!
Because, the sign is made out of stryofoam the edges are not as smooth and finished as I would like. I love the look but up close, it is rough looking. So I had my husband use extra floor trim that we had and frame the entire sign. Before he did that, my husband painted the trim a semi-gloss black. And this is the finished look!
I think the frame just makes the entire sign stand out! AND I have finished the Superman and Captain America signs as well! My husband framed and painted and put them all on my son's wall. Sometimes I am really happy to have a rained out weekend as my son's room went from nearly all bare walls to an almost finished Superhero room in less then 24 hours. I will post the other 2 signs and an updated picture of the entire room very soon!
Friends and Brothers are Better then Superheros!
In a previous post, I showed how to make photo canvases by using stryofoam and fabric. Now, you will see how these canvases look on the wall! With a special, vinyl sign above it!
To attach the canvases I used a product I bought at Walmart called Command Strips, very similar to velcro but does not hurt the wall (or paint) when you want to remove it. Because my canvases are super light this seemed to be the easiest way to attach it.
As you can tell by the picture above I used tape as markers to ensure the bottom was straight and that all pictures were the right distance from each other. At this point I wasn't sure if I wanted to put the sign above or below the canvases so was placing them temporarily on the wall to determine the right location. The next picture shows the final product!
Now you can see the entire wall! It's still not finished but getting very close!
To attach the canvases I used a product I bought at Walmart called Command Strips, very similar to velcro but does not hurt the wall (or paint) when you want to remove it. Because my canvases are super light this seemed to be the easiest way to attach it.
As you can tell by the picture above I used tape as markers to ensure the bottom was straight and that all pictures were the right distance from each other. At this point I wasn't sure if I wanted to put the sign above or below the canvases so was placing them temporarily on the wall to determine the right location. The next picture shows the final product!
Now you can see the entire wall! It's still not finished but getting very close!
Custom Super Hero Valance
Lately, a good portion of my projects have been to convert my son's bedroom from a Disney Cars room to a Super Hero room. I decided to create a custom valance for the room made out of styrofoam. The only reason I knew that this is possible to do is from a very good friend of mine, Ali, who is so creative and inspiring. She had created custom valances for every window in her house out of stryofoam so I had to try it out.
I did not take pictures while creating the valance but will be working on another valance very soon and will ensure pictures are taken then. But, it is relatively simple to do especially if you have an extra set of hands to help. I went back to my very creative and inspiring friend, Ali, for tips and what "not to do" and also used this website for a step by step tutorial. I used 1/2 inch thick styrofoam and then went to Michael's to find some glue that will work specifically for stryofoam as most glues will "eat it". Toothpicks, T-pins, tape, a stapler, batting and fabric is the rest of my supply list.
When putting the pieces together we did a very thin line of glue and then inserted toothpicks to secure the pieces of foam together. That was it, after letting it sit for maybe 30 minutes we wrapped the stryofoam with batting which I actually secured with clear, mover's tape. When attaching the fabric, we secured it with T-pins but then also the stapler. The hardest part was the corners, wrapping it so no bulges appeared. Realistically, the stapler was not needed and on my second canvas, we did not use the stapler at all. I don't think it matters either way, my thought process was by only securing with T-pins it would be easier to remove the fabric and re-wrap when you wanted a new look. However, you could just wrap new fabric over the existing fabric too so I think either way is fine. And, I even went up to 1 inch thick stryofoam now to test on the third valance that I will be completing very soon. I doubt it will make any difference but just wanted to see for myself.
My final super hero custom valance is now complete and my son loves it!
To the right of the Superman valance is a canvas of Spiderman. That is also made out of stryofoam and you can read all about it on the blog right below this one! : )
I did not take pictures while creating the valance but will be working on another valance very soon and will ensure pictures are taken then. But, it is relatively simple to do especially if you have an extra set of hands to help. I went back to my very creative and inspiring friend, Ali, for tips and what "not to do" and also used this website for a step by step tutorial. I used 1/2 inch thick styrofoam and then went to Michael's to find some glue that will work specifically for stryofoam as most glues will "eat it". Toothpicks, T-pins, tape, a stapler, batting and fabric is the rest of my supply list.
When putting the pieces together we did a very thin line of glue and then inserted toothpicks to secure the pieces of foam together. That was it, after letting it sit for maybe 30 minutes we wrapped the stryofoam with batting which I actually secured with clear, mover's tape. When attaching the fabric, we secured it with T-pins but then also the stapler. The hardest part was the corners, wrapping it so no bulges appeared. Realistically, the stapler was not needed and on my second canvas, we did not use the stapler at all. I don't think it matters either way, my thought process was by only securing with T-pins it would be easier to remove the fabric and re-wrap when you wanted a new look. However, you could just wrap new fabric over the existing fabric too so I think either way is fine. And, I even went up to 1 inch thick stryofoam now to test on the third valance that I will be completing very soon. I doubt it will make any difference but just wanted to see for myself.
My final super hero custom valance is now complete and my son loves it!
Subscribe to:
Posts (Atom)
