Welcome to my Website! In addition to creating and selling my products, I love to try new ideas, many of which will be showcased in my blog found on the Home page! Check back often for new blogs and new items I will have for sale! Need something designed but do not see it in my catalog listed under the Vinyl Templates tab? I can custom design nearly anything, please contact me and we may be able to create a wonderful product based on your ideas! -- Cindy

Family Eye Chart

I purchased a really nice and big picture frame on clearance for $2 about six months ago from Michaels. It has been collecting dust this entire time but I knew that once I came up with the right idea, the picture frame will be perfect! Long story short, while trying to finish decorating my bathroom I realized the really long metal art piece in the living room turned sideways would look perfect in the bathroom. So the bathroom is done and now I finally found a place for my $2 picture frame. I just need to vinyl it. : )

So this is how my project started:


The picture frame is $2, the matte board I bought with a 40% off coupon at Hobby Lobby making it $4.80. The rest of the materials is supplies I already have in my house. After several nights of designing the sign on my computer and then cutting, weeding the vinyl out, I have my finished eye chart.


I used dark blue vinyl to finish the sign. I could have used black but I thought this color would give it a little better look then just black and white. I also based my design off of a personalized eye chart I found on Red Envelope. I took that concept and related it to our family. I finished the chart by describing personal highlights of each member of the family. I loved how it turned out! And really love how my project cost less then $7 which is considerably cheaper then the eye chart on Red Envelope's website and it is created based solely on my family's "story".

Gallery Wall

One of my many goals this year is to finally finish decorating our house that we moved into over 2 1/2 years ago! I have many bare walls and too many areas of the house that need updating, the perfect example is our picture frames that have not been updated for nearly 2 1/2 years!

This project moved up to top priority only because I hurt my back and was confined to a chair for almost a week. The one thing I could do was sit with my laptop and search through hundreds of pictures. Once I updated all of the picture frames I wanted to move a group of picture frames from one wall to a different wall as I have a new project for the "yellow" wall which will hopefully be completed next weekend. This is what the first wall looked like before updating the pictures:


So, the picture is not very good. I didn't realize I didn't have a better picture until after I took everything down. But the yellow wall is what you see when you walk down into the basement into the big family room. This wasn't the best place for the pictures because the family room holds all of the balls, swords, plastic golf clubs, etc... that the boys play with all day and an accident was just waiting to happen. So we took down the vinyl and the frames, updated the frames and now moved it to this wall:


Now when you go upstairs from the basement (notice the yellow wall) you see the frames moved to the wall at the landing. And the other view is from the main floor looking down. Now I needed to add a vinyl saying but wanted something different then my last saying for these picture frames which said "...Because every picture has a story to tell". I then realized that every frame and every picture in the frame has either one or both of my sons in it. So I came up with the idea to do something that talks about my boys, specifically what they like. This is what I decided to do:


Now I need to add something above the light as well but for now I love how the pictures and vinyl sayings turned out! And if you also look closely in the pictures above, the wood right next to the hand rails changed colors! While I was updating the wall, my husband was staining the wood to match the darker colored hand rails he put in last Fall. : )

Hopefully next weekend I will have a new post on the updated yellow wall. I need my husband's help for part of it and due to his work schedule this week we just won't have time until next weekend to get it done!

Happy New Year!

My year is not starting off too good in the "blog" department considering this is the 17th day of 2012 and I do not have a new post yet! I did so well in December especially considering how busy the month was! Despite my lack of postings I have been busy and will have several new projects posted in the next few days.

My husband is being a trooper and helping me with all of these new projects that must be done "now" even though he has his own list of "Honey-Do" projects that I gave him! I won't give away what I'm working on but it does deal with chalkboard paint, picture frames, cookbooks, vinyl, gift bags, and floor trim. Ok, so maybe not all of those things are for one project but I have been using them all this last week and am hoping to finish these within the next few days.

So check back in the next couple of days to see some of the projects that I have been working on! :)

Cindy

Coffee mugs - Vinyled

In a previous post I personalized 2 coffee mugs to give as Christmas presents and now I have more to show off!

I used the same dark red mugs with a dark brown on the inside that I found from Walmart. The front of the mugs has the individual names and then I used a different coffee design for the back of the mug. The coffee sayings and designs I found online from Laura which was on her blog, The Alliance Trader.

The pictures below show the new coffee mugs.


The next coffee mug is a gift to a hair dresser. The saying on the back says "I'm a Beautician not a Magician".


The front of the cup has the person's first name on it just like all of the other coffee mugs. Here is a picture of some of the mugs together!


I hope all of you had a very Merry Christmas and a Happy and Safe New Year!

Picture Frame - Vinyled

This project was a fun project to complete as I haven't worked much with flowers and picture frames and I knew who was the intended recipient of the gift. I did make the "giver" sit at my computer and pick out the flowers, the sizes and the colors as she had a "vision" and I didn't want to change that. I also had her put the flowers on the frame.

We started with a nice frame from Target.


I then added the saying on the top that said "Friends are flowers in the garden of life." and the bottom of the frame I added the names "Grace and Olivia". The two girls are best friends and have been in daycare together since infants and now are in preschool together! Now the frame is starting to look pretty nice.


After the flowers were picked out and cut, my part was done. I wanted the "giver" to put on the flowers in the design she wanted to not interfere with the most important part of the project that you will see in a little bit. Since we are putting the flowers on the back side of the glass, I cut the designs in reverse and pointed out to put the flower on first, then the stems to ensure the layering looked right from the front.

And now the frame looks like this!


And now with the final piece completed, we have a very nice collage of pictures of the two little girls from babies to nearly 4 years of age!


I love how the project turned out and on how creative my friend is to come up with this project all by herself!

Cutting Board - Monogram

A few weeks ago my husband asked me for glass cutting boards for Christmas. It makes sense as I have made quite a few glass cutting boards for other people but yet we have really old cutting boards that are probably filled with bacteria as they have scratches and cuts all over them. So I figured, if he wants new cutting boards then I am going to decorate them with some vinyl.

And if my husband is reading this and it's BEFORE December 25th, please click the "X" in the upper right hand corner of this page as you are to stay off of this page until AFTER Christmas! :)

This project was much harder then I anticipated as I wanted to do something different. And since I haven't really worked much with arches and putting text on circles, I spent a considerable amount of time learning this task instead of just designing. The program I use isn't the easiest for doing this either which does not help at all. Then to make things more difficult I wanted to have two colors on the cutting board and trying to layer that was a little tedious. In the end, I was able to make things work and it was definitely worth any frustrations I may have experienced.

The picture below shows the design cut in two pieces based on color.


Notice I also had to cut the items "flipped" as I am putting the vinyl on the backside of a glass cutting board. I won't mention how many times I have forgot to do this important step and had to throw away a complete sign, typically after I weeded out all the excess vinyl before realizing the sign is actually backwards! Or I actually remember to flip the sign but then use "indoor" vinyl instead of "outdoor" vinyl. Indoor vinyl will not stand up to water and then I end up with ANOTHER sign to throw out as it's flipped and won't work for most other projects!

The next picture shows the red sign now layered on the black sign with transfer tape on. This step is hard as you have to line it up right the first time or you will start all over by cutting a brand new sign....there is no "redo" button!


Now the next picture shows the vinyl on the cutting board. It still looks backwards because we are looking at the cutting board from the underside of it. This is where I place the vinyl so you do not actually cut on it, it shows through the glass to the front.


And now when looking at the glass cutting board from the top of the board, we have the finished product!


I love the 2 different colors on the cutting board! Hopefully, my husband will like it too!

Christmas Charger

This post will be short and sweet as I just wanted to share a new Christmas Charger that I made for our neighbors. They always come over with a huge plate of home made goodies or other treats for every special occasion. So I try and find little gifts that I can make to return the favor, that and they are the best neighbors we could ask for!
I'm not exactly sure where I found this saying as I know I found it off the Internet. If I do not give someone proper credit for it, I apologize, but it has been sitting in my huge list of files for over a year now. I love the saying and it fits my neighbors perfectly. I used light beige, outdoor vinyl on a dark red Christmas charger and here is my finished product.


I like it as the plate and design is nice and simple, but displays a very meaningful message. I hope my neighbors like it as well!

Kitchen Aid Mixer - Subway Art

I love Subway Art and recently came across a wonder blog, called "A Little of this, a little of that" and the topic I read was about Subway Art. And the lady, Sarah, designed a file using Subway Art specifically for her Kitchen Aid mixer! The finished designed was awesome and I was able to get the file from her!

This is my boring Kitchen Aid mixer.


And this is my Kitchen Aid mixer with dark red Subway Art!


And these are my two little bakers using the newly decorated mixer!


Personalized Coffee Mugs

My youngest boy is in his first year of preschool and loves it! There are 20 kids in class with 2 teachers and after each class Kevin is bragging about what they learn, the snacks they ate and every other little detail of class. With Christmas coming, I wanted to give a small gift to the two teachers and decided on this:


Ok, I am not going to just give one coffee cup as a gift where they must take turns using it...that would be a little cheesy (and cheap!). I picked up two of these coffee cups and then turned to my ever loyal Cricut to dress it up a bit. I first started with their names.


Just adding the names makes the cup look a lot better (and not so cheap!). Then I found a coffee saying online from Laurie at her blog, The Alliance Trader. Now my cups looks like this!


I haven't decided what yet, but I will fill up the cups with some yummy treats, add our family Christmas card and have my son give his teachers their present at their Preschool Christmas party. The project was very simple but I'm hoping adding a little bit of vinyl makes a nice, personalized touch for the teachers.

Cindy

Christmas Ornaments

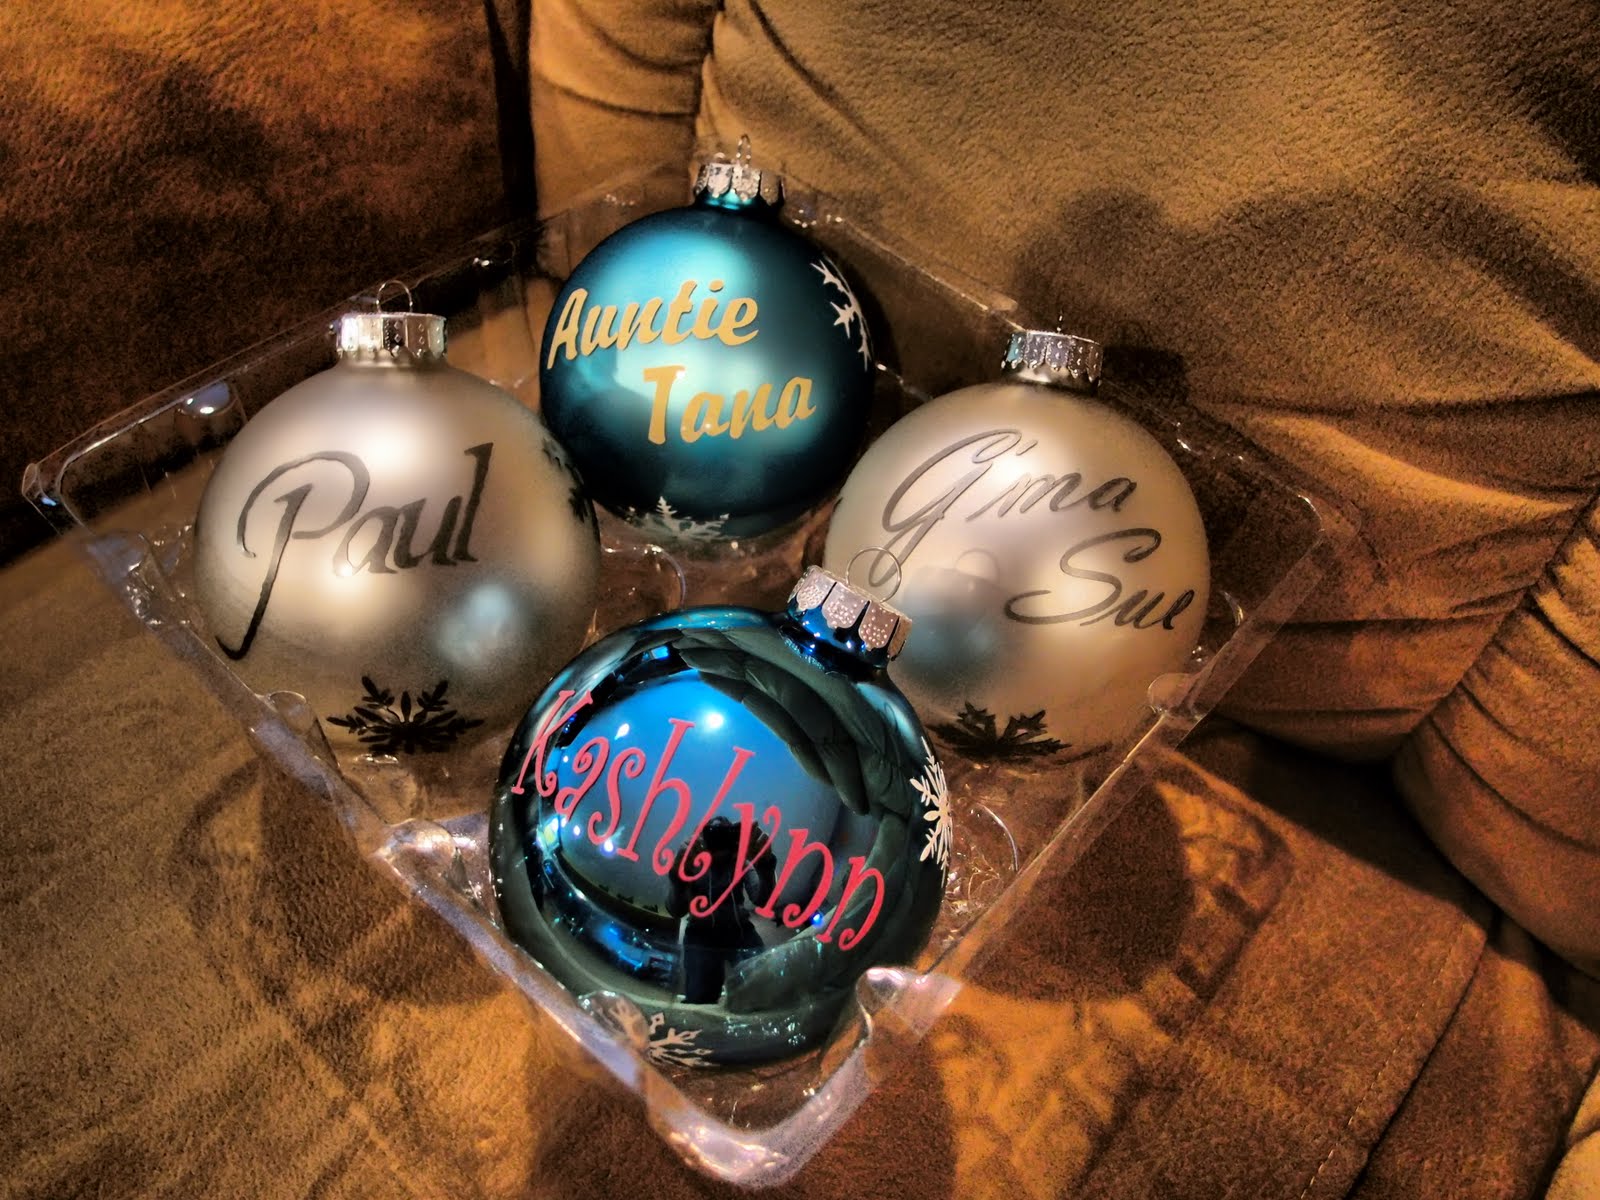
Christmas ornaments are fun to make and very popular. Each ornament has a name on the front and then 3 or 4 snowflakes around the ornament. Last year I made a bunch and now have a few more to show off. It is very difficult to take decent pictures of these (or maybe it's just me) so I apologize ahead of time for the quality of the picture. In person, the ornaments look great!


And here is another example of the one set of ornaments. I have a new camera so am trying different settings to see how things turn out!